Connection to the control unit
This guide covers the first step towards your streaming setup: Connecting the external Streaming PC to the RobCo Control Unit (CU) using a network cable.
A Control Unit has two external network interfaces, the peripheral port and the PC port, both of which support streaming. The following sections describe the network configuration for both the peripheral and PC port.
Note
It is recommended to use the peripheral port for streaming, as it allows a static IP configuration and offers a fast and reliable communication channel to stream data to the robot and back.
Connection via the peripheral port
Connect the Streaming PC to the CU’s network port labeled Peripheral using a network cable
On the Streaming PC, configure the network adapter settings as follows:
Manual IPv4 configuration
Assign a static IP address in the
192.168.1.{2-254}range, e.g.192.168.1.99Open a web browser and navigate to http://192.168.1.1 to access RobFlow
Tip
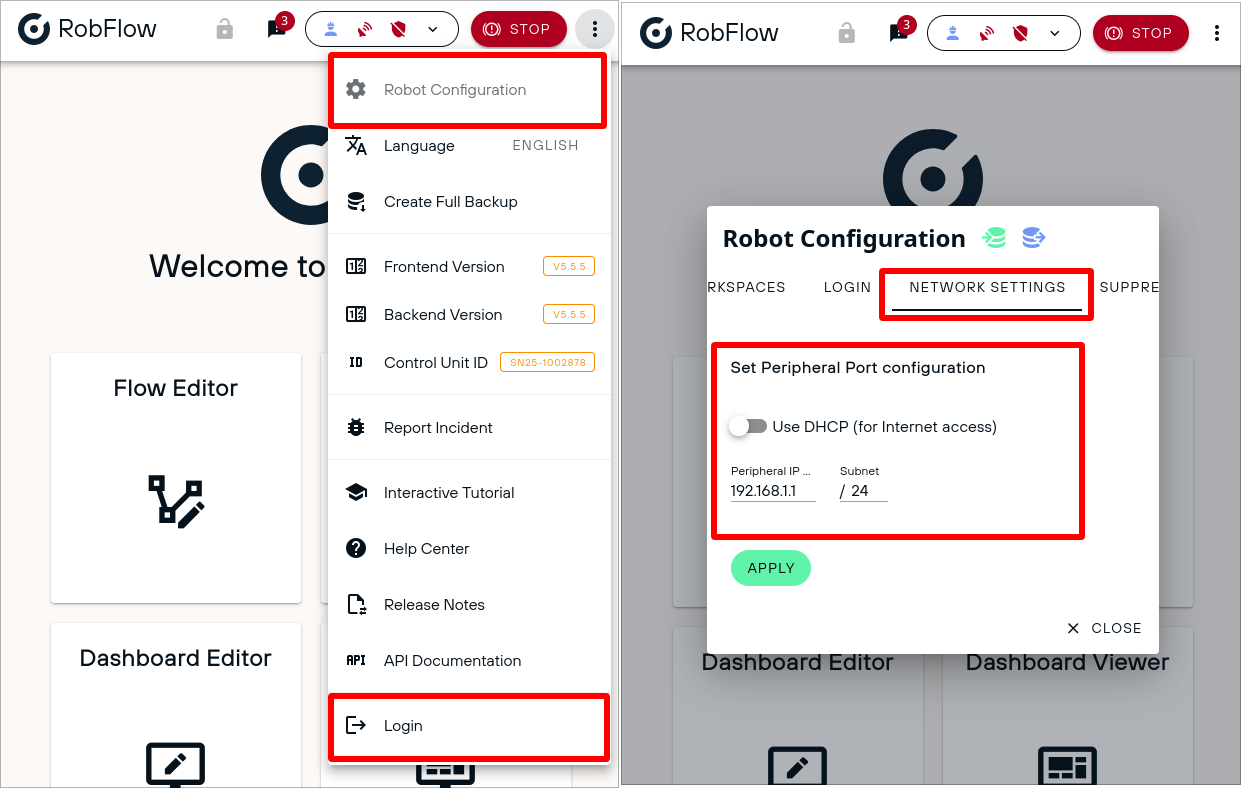
If required, the IP address configuration of the CU’s peripheral port can be changed from RobFlow:
In the top right, click the three dots to open the settings pane
Click the last entry to login with your RobFlow credentials
Again, open the settings pane and open the “Robot Configuration” menu
Search for “Network settings” and adjust the peripheral port settings as desired
Warning
Note: The Streaming PC must not use the same IP address as the Control Unit.
Connection via the PC port
(Alternative, the peripheral port is preferred!)
On the control unit, search for the ethernet port that is labeled with “PC”
Connect the control unit to the Host Hardware using an ethernet cable
On your host hardware, open the network adapter settings. Navigate to the active network interface and adjust the settings to allow dynamic IP management (DHCP).
The IP of the control unit is now
192.168.3.1. You can access RobFlow from your browser by navigating to192.168.3.1/and also stream to this IP in the following steps.
Summary of network settings
The following table gives an overview of the IP address assignment when using the peripheral or PC port:
Address |
Peripheral port |
PC port |
|---|---|---|
CU IP address |
or manual configuration in RobFlow |
|
Streaming PC IP address |
or address from range configured in RobFlow. |
(assigned automatically via DHCP) |
Troubleshooting
This section lists previously encountered issues and possible solutions.
No connection to the CU
Make sure all hardware used to establish the connection is functional
Check that the network cable is fully inserted on both sides
If connected to the peripheral port:
Ensure the Streaming PC network interface has been assigned a static IP address
Try to assign a different static IP to your host, the address might already be in use
Ensure the assigned IP address is in the correct subet, i.e. 192.168.1.{2-254} (unless configured otherwise in RobFlow)
Try to connect using the PC port and make sure the peripheral port settings are as expected (refer to the section above for instructions how to change the peripheral port settings)
If connected to the PC port:
Ensure your network adapter is configured to use DHCP (automatic IP configuration)